
Photo courtesy Wikimedia Commons
Do you love articles like this and want to see more of them? This free website’s biggest source of support is when you use the ad links or the links embedded in the article when you buy anything, regardless of the country in which you live. I receive nothing for my efforts if you buy elsewhere. Thank you for your support! —Mason
Are you ready to try your hand at processing black-and-white film and printing it in your own darkroom? It has never been easier, thanks to the availability of cheap used enlargers via eBay or inexpensive new ones, as well as material that can virtually light-proof any room.
Remember, this is a very basic setup that can be broken down relatively easy. A more permanent darkroom may require some contracting skills and/or a bigger budget.
Basic darkroom requirements
A darkroom needs to be dark—no light besides the amber or red light that printing papers aren’t sensitive to. You’ll need enough outlets to handle an enlarger, plug-in timer, and a safelight or two. A place to plug in your radio or Smart Phone is also not a bad idea, since music helps you get through the more tedious parts of processing.
A darkroom has a dry side and a wet side. The dry side is a solid surface for your enlarger and space to store paper and other darkroom gadgetry. The wet side is where you put your trays filled with developer, stop bath, fixer, hypo clearing agent, and a water tray. These can be stacked in a stair-type layout if you’re tight on room, but if you have four 11×14-inch trays, plan on about 48 inches of surface. The wet side should be adjacent to the water source and drainage.
So, you’ll need running water. Which limits you to three possibilities: Laundry room, bathroom, or kitchen.
The Best Place For Your Darkroom
Your darkroom should be anywhere that has running water, and preferably a decent-sized sink. Laundry rooms are especially suitable because the slop sink is usually large enough to hold a washing tray that can accommodate up to 11×14-inch prints.
A room with no windows and has counter space is ideal. All you’ll need to do is light-proof a doorway. However, you can be creative. A wood plank that you buy at Home Depot can be cut to your specs and placed over the washer-drier, for instance, to create a Wet Side. A portable kitchen cart with lockable wheels might be a good place for your enlarger and to store your supplies underneath—and you can roll it out of the way when you need the space for its original use.
If you have windows, you’ll need something to black them out with. While black-out curtains are helpful, you may also want to consider Delta Black-Out Plastic Material, which costs $40 for a 48 inch x 16-foot roll—very cost-effective. Attach it using black Gaffer tape to light-seal your windows.
Budget-saving idea: For smaller windows, I taped aluminum foil against the glass, with a little overlap over the wood, to block out outside light. You’ll still need to tape over the gaps between the window frame and the sash.
Open doorway with no door? Hang a blackout window curtain over it. The Eclipse Fresno Blackout Window Curtain Panel, 52 x 63-Inch, Espresso should cover most doorways. Buy two—one for each side, to double-block the light, and hang it so the bottoms drag on the floor a bit.
How do you know it’s light proof? After you think you’ve blocked all the light, stand in the middle of the room with the lights off for a few minutes. Let your eyes get used to the dark. Do you see light here and there? Remember where it came from, then use gaffer tape or the material mentioned above and keep working at it.
Between sessions be sure to open the windows and doors so you can air things out and remove the fumes.

Buying Guide: What You Need for a basic darkroom.
The Enlarger
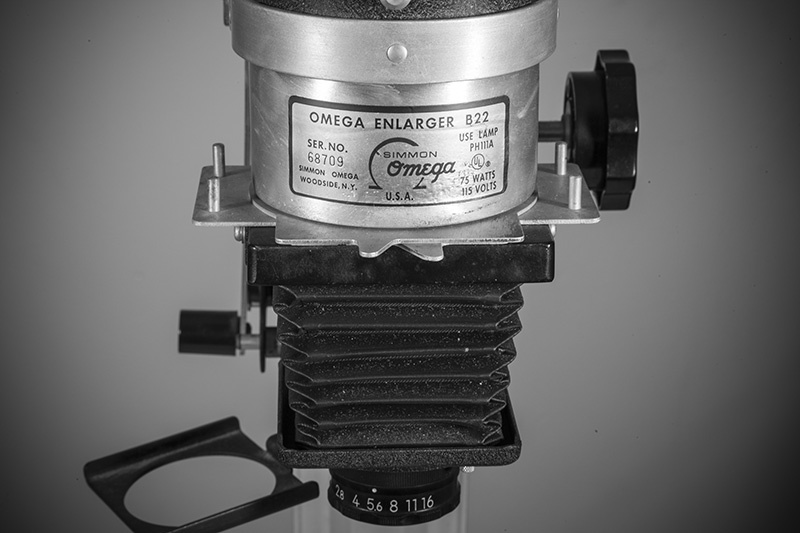
Smaller enlargers that can accommodate 35mm and 120 negatives will get you started, and older models are relatively inexpensive if you buy them used on eBay. Models that used to cost hundreds or even thousands of dollars can now be had for under $100. Look for a relatively small and lightweight model such as the the Omega B22, B6, or B600, which were popular workhorses and are easy to move out of the way when not in used.
The Durst M600 and Beseler 23C (great for medium format) are also solid choices but they’re bigger and heavier. Read the information carefully and make sure negative carriers for your size film are included. You may otherwise have a tough time finding them. Same thing with the lens. An enlarger lens is necessary but may be sold separately. If you’re using 35mm film, get a 50mm lens. If you’re using 120, get a 75mm lens. Beseler, Nikon, Rodenstock, Olympus and Schneider are all reliable brands.
Warning! Stay away from any Vintage Federal enlarger, even though they are plentiful on eBay. They are infamous for overheating and burning negatives. (Taken from personal experience; it was my first enlarger. Just don’t.)
Easel does it
You will also need an easel, which holds your printing paper in place under the enlarger. Used easels are plentiful on eBay, but a two-sided 4-in-1 easel (which has places for pocket, 3×5, 5×7, and 8×10 prints) is a cost-effective, space-saving investment. You will also need a Focus Finder, which will help you make sure your prints are sharp.
Trays? Bien!
You’ll need at least 3 trays for print development. 11×14 is a good choice and will cover you for most prints. A larger tub that you can buy at a home improvement center which can accomodate 11×14-inch prints, will be needed for washing. You will need to drill 2-3 holes on the side about 2 inches from the bottom so the water will drain. You’ll also need tongs to move prints from one tray to the other. You’ll need a graduate to measure out your liquids, a funnel, a stirrer, an accurate thermometer, and at least 3 brown jars to store the chemicals.
Timing is everything
Finally, you will need a timer, since printing and processing times need to be carefully set. Spurge on this and get a Gralab 300 60-minute Darkroom Timer. It controls your enlarger or can work separately for timing processing at the flip of a switch.
Safelight at first
While you could buy an amber darkroom light new or used on eBay, a plain 7-watt red bulb in an an existing light fixture will do the job just as well and save you some money. You can find one at your local home renovation supplier, or you can order a lifetime supply of this Novelty Light, 7.5-S11 Commerical Grade S11 Ceramic Replacement Bulbs, E26 Medium Base, 7 Watt, 25 Pack (Red). I used that as my only darkroom light for many, many years. Want to step up? The Premier 10×12 Safelight is the industry standard.
Other miscellaneous gadgets you may or may not need:
Paper trimmer : A great tool if you’re making odd-sized prints, and worth getting for cutting and matting prints for framing. If you only need a strip of paper for a test strip, use scissors. You already have them.
Dodging Kit: These are essentially cut out shapes at the end of a thin stick that you move around as you’re printing to selectively lighten areas of the print. You can make ’em yourself with a scissor, tape, cardboard, and an straightened wire hanger. They’re almost impossible to find new.
Blotter Book: How do you dry your prints? You can lay ’em out on a rack, or if you’re printing on fiber, use a blotter book. Put something heavy on top so the prints dry flat.
Chemicals? Paper? Yeah, you’ll need ’em! More about that in upcoming guides.