While many photographers who prefer black-and-white images will convert their color originals in Adobe Photoshop or Photoshop Elements, if you shoot RAW (and you SHOULD shoot RAW) you may want to do it in Adobe Photoshop Lightroom. This is especially true if you’re doing portrait or other kinds of photography under consistent lighting conditions.
One of Adobe Photoshop Lightroom’s strengths is that it gives you the power to work on one image, then instantly apply all of your changes to other images in the same sequence. Simply select the images, work on the first one, hit the “Sync” button, and in moments, all your changes are automatically applied to the rest of the images in that batch, thereby streamlining your workflow. Alternatively, you can save your set of changes as custom profiles to apply to future images.

Sample image: Before and After. Scroll down to see how it was done.
This works whether you’re making simple color balance adjustments, adding shadow detail, applying a bit of clarity or a combination of all of the above. And, it has robust black-and-white conversion tools.
While Lightroom can handle JPEGs, there is more information you can work with in a RAW original. When you’ve finished, you can convert the image to JPG, and open it in Photoshop to make further changes if needed. I generally shoot RAW + JPEG. It may require more storage, but hey, storage is cheap. Don’t worry about it.
Adobe Lightroom CC is available as a download under a license agreement that costs a few dollars a month. I recommend the Lightroom/Photoshop package, which is collectively less expensive than buying a disc, and is updated at no additional cost as part of the deal.
Case study: A portrait session
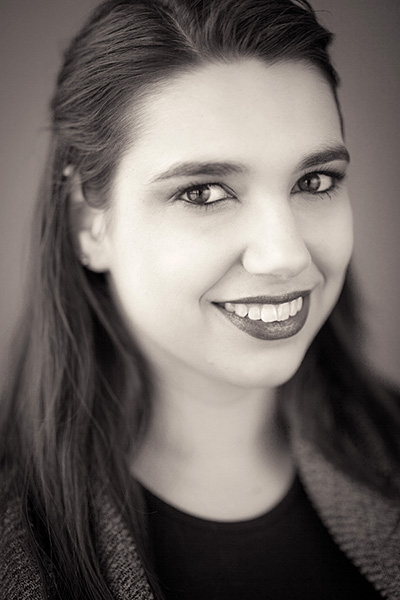
I recently had a fun portrait session with Leanne, using a big Zeiss 85mm f/1.4 lens at its widest aperture so I could get the effect of using a super-narrow depth of field. The images straight out of camera were great (mostly because Leanne is former Miss Long Island beauty pageant queen, and she loves the camera), but I wanted to see how she’d look in glorious Black and White.
I imported all of my RAW files from the session to Lightroom and got to work. Let’s take a step-by-step look at one way to reinterpret a color original as a classic black and white image.

The color original: The original image, shot in front of a window, was underexposed. The first thing I did when I opened the image in RAW was to increase the exposure by a bit over a stop.

First, desaturate: Before making any other changes, I went to the Treatment bar and selected Black & White (red arrow). The image was immediately desaturated. Alternatively, I could have gone to the Presence sliders and moved the Saturation slider all the way to the left. The good news is that either way, I can still adjust the relative tonality of the colors in the image.

Play with sliders: Now I moved down to the Black & White mix, a series of sliders that work like color filters used to do, changing the relative tonality of different colors within the image. Unlike glass filters, sliders let you vary the intensity of the effect. Move the color to the left to globally darken that color wherever it appears in the image; move it to the right to lighten the same color. I moved the red slider a little to the left to darken her lipstick. If had moved it too far, her lips would have appeared too dark and details would have blocked up. I was able to try different intensities and settled on one that worked for me.

Experiment! I went down the colors and tried each slider to see how it affected the picture. In most cases the effect was subtle or not even noticeable. When I moved the green slider to the left, her teeth and eyes became slightly brighter. You have a lot of room for interpretation here, and all you have to do is move the slider to see if you like the effect and move it back if you don’t.
Split Toning Is Easy
While many black-and-white enthusiasts would be happy to stop there, another feature that Lightroom offers is split toning. Split toning is an effect where you can add one type of color tint to an image’s highlights, and another tint for the shadows. There are many ways to do split toning, and no hard and fast rules. I use split toning conservatively just to give the image a richer (but still natural) feel, but if you prefer a more exaggerated effect, go for it!
The advantage of applying split toning in Lightroom over Photoshop is that you don’t need to work with adjustment layers or channel mixers—just use the highlights and shadows sliders to adjust the hue and saturation of the tones you want to set for each. It’s a simpler process—and as with all the other effects, it can be applied to multiple images at the touch of a button once you get the first one to your liking.

Hue got it: Click on the longish rectangular box above the sliders to select a basic hue. You can chose any color and intensity in the pop-up color palette, or one of the five hues on top. The disadvantage of using this pop-up box is that you don’t see the effect until after you’ve closed it.

Setting the Tone: Next, you can change the effect and view it on the image live by moving the hue and saturation sliders. I’ve chosen a slight sepia look for the highlights. I’d skip the pallette (see previous image) and go directly to the sliders here to get instant feedback.

Split it up: I chose a subtly redder hue for the shadows, which adds understated dimensionality to the photo. The effect is one I used to struggle to get in the darkroom using toxic chemicals!

More Effects? How about a little vignette? I scrolled down to the Effects submenu to add a touch of vignetting. I used the default midpoint, roundness and feathering but went to -22 for the amount of vignetting to darken the corners and help the viewer focus even more on the Leanne’s face.

Take it with a grain: You can also add grain to the image. Simply move the Amount slider to activate the feature, then play with the Size and Roughness to emulate the film look. I played with the grain, but felt that adding grain would ruin the look of this image—it was either too subtle, or made her skin look splotchy. Here’s a detail of Leanne’s eye with grain added:
At 100%, above, you can see the grainy effect. When viewing the full image on screen, this effect was too subtle, but it can look quite nice in a print.
Once I was done, I selected all of the images that I wanted to convert to black and white, then hit the Sync button (near the lower right corner of the Lightroom workspace). Then I exported the images into a folder, and opened and reviewed them in Photoshop. I selected my favorite pose, then used the healing and cloning tools to get rid of any imperfections (which were few and far between), and made some final histogram adjustments, and that was it!

Here’s the final result, ready to print. The entire process took me about two minutes, and most of that time was spent making creative decisions about where to move the sliders. It really is that quick and easy!