If you’re printing black & white photos before calibrating your monitor, you’re throwing money away.
By Mason Resnick
Are you playing monitor roulette? That’s the game where you rely on your monitor to determine whether the photo you’re working on will look as nice in print as it does on your screen. And then, you make prints and they are too light, too dark, may have a color tint that you weren’t expecting. Your print doesn’t match your screen.
Do you love articles like this and want to see more of them? This free website’s biggest source of support is when you follow ads and text links to Adorama when you buy anything. I receive nothing for my efforts if you buy elsewhere. Thank you for your support! —Mason
Why does this happen? Blame the monitor! Your monitor’s brightness, contrast and color rendering can and likely will change over time. It is usually an imperceptible change that you only notice when your prints don’t match what you see on screen. While Apple products are generally fine out of the box, but they eventually change; other brand monitors may not be calibrated accurately from day one.

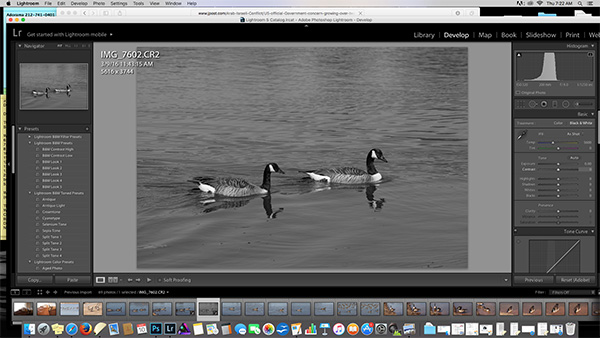
Before: An uncalibrated monitor’s color balance and brightness can change over time, and since it’s gradual, you may not notice it. Here’s a simulation of a what monitor that hasn’t been calibrated in a while might look like while editing a black-and-white image in Lightroom. As you can see, I might be tempted to make the print too light because it is displaying too dark—and a little blue.

After: This is actually a screen shot from my recently calibrated monitor. Now I can work on the image and get matching results when I print.
The solution to calibrate your monitor. It will require an investment in a tool called a Monitor Calibrator, which can cost as little as just shy of $100, or in the thousands. There are plenty of good, affordable choices for under $200, and we’ll get to that shortly.
The goal is to get a consistent color balance, brightness and contrast so what you see on your screen matches what you see on your prints.
One thing to keep in mind, though, is that the image on your computer monitor is a projected image, while a print is reflecting light. Since the quality of the print depends on the quality of the light in the place where you’re viewing it. Make sure you have a bright, neutral light source so when you’re comparing print to monitor image, you can compare apples to apples.
If you’re still seeing a difference, even if it is just slight, you will want to calibrate your monitor. The two biggest monitor calibration manufacturers are X-Rite and Datacolor. Both offer products at different price levels, but they all work basically the same way.

Step by step
The basic setup is a calibration tool and software that operates it. Load the software onto your computer, and follow the prompts on screen. If you know about ICC profiles and other more advanced features you can adjust them manually, but you don’t need to if you aren’t sure.
The software will prompt you to place the calibration tool over the monitor screen, and will usually provide a target to aid you in placement. It generally hangs over the top of the monitor to stay in place. Make sure it is flush against the surface of your monitor.
All but the most basic monitor calibration tools have a rear-facing sensor that measures ambient light. Make sure you have the same lights on for this as you would when you’re normally working, and this will be taken into account.

llustrative photo of a typical calibration setup, provided by X-Rite.
Then the system takes over. The monitor will cycle through a sequence of colors and the calibration tool will compare the monitor image with its database of how the color should actually look. Same deal with brighness (of greater concern to black-and-white photographers). It collects all of this information and automatically adjusts the monitor. Some software packages let you compare your colors before and after calibration. Be prepared to be shocked!
But that’s basically it. Once the cycle is done, you can name your color profile. It’s a good idea to check your monitor’s calibration every month or so. Also, make sure your monitor has been running at least 5-10 minutes before making mission-critical changes to your photos.
Now you have prepared your monitor so that you can work on your black-and-white prints and get consistent and outstanding results!
Buying Guide: Three Recommended Monitor Calibrators
Here are 3 Monitor calibration systems for under $200 that will do the job:

The ColorMunki Display is a low-cost calibration tool that is designed for serious professional photographers. It is intuitive to use, with on-screen wizard controls to guide you through the process. It even takes into account the ambient light and the amount of flare bouncing off your monitor screen when adjusting your display.

The least expensive color monitor on the market, this consumer-level unit will calibrate your monitor simply and easily, but doesn’t include the ability to compensate for ambient light. If you’re on a limited budget, however, it’s a reasonable choice.

One of the highest consumer-rated color calibrators for under $200, the Spyder5 Pro gets high marks for consistency and reliability—two essential features for a product that is supposed to make your monitor display consistently and reliably!